a Tutorial by Joachim Fenkes
Introduction
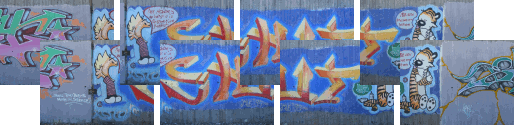
Not so long ago, passing through a railway station, I noticed a long wall covered in graffitti - not the ugly vandalism you see much too often, but well-done tags, one nicely sprayed next to the other and none of them stained by the amateurish works of envious would-be sprayers. What hit my eye in particular was one of these pictures, which was featuring my two favourite cartoon characters: Calvin and Hobbes!
So, after having passed through that station several times and never being brave enough to jump out of the train, shoot a quick picture of the painting and get into the train again before it leaves, I decided one sunny weekend to just leave at that station on purpose and find my way back home by bike. That way, I did not only have enough time to make a nice picture of the Calvin and Hobbes graffitto, I had enough time to photograph the whole wall in fifty-one pictures!
My intention was to put all these pictures together using Hugin and the Panorama Tools - a project which proved to be trickier than I thought, yet possible. In this tutorial, I'm going to retrace my steps up to the final image, leaving out all the dead ends I ran into, so others can benefit as well from the two evenings I spent on this.
The Real World
Before any work could be done at the computer, the photos had to be taken, of course. In my case, I used my trusty Canon PowerShot A85 on a sunny day, so I could be sure the source pictures, if created with care, would be of good quality.
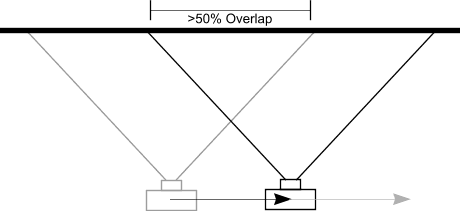
Taking the photos of the long wall (about 40 meters long and four meters high) was not done like panoramas are usually created (by rotating the camera about the lens' nodal point), but instead I took photos with the camera's focal plane parallel to the wall, moving sideways by about one meter after each shot. That way, I ended up with over 50% of overlap - for simple stitching, that might seem like overkill, but in the end, it saved my life.
I's a good idea to make sure you're always shooting from approximately the same height and from the same distance to the wall. I didn't have a tripod with me, but I could simply put the camera on the rim of the platform for it to have the ideal shooting height. Do yourself a favor, like I did, and check every photo you make before moving on. Also, it will be a good idea to put your camera into manual mode and set the exposure by hand - but that should be clear to you already ,)
Tools of the Trade
Now to get to the computerish part! The tools I have used for my project are:
Most of these links can also be found on the Hugin download page, so if my links are broken, please notify me and then walk over to the Hugin project.
Mark my Features
The first step was pretty easy, although time-consuming: After copying the photos from my camera, I fed all the photos I wanted to use to Autopano-SIFT, enabled the Refinement Step and gave it a go. Autopano-SIFT v1.4 tends to stall when it's interrupted in any way, even by switching tasks, so I let the PC chew on my pictures for half an hour while reading a book. Or listening to some music.
After Autopano-SIFT had finished, I immediately made a copy of the generated .pto file to have a safe base to return to if I goof up.
Setup
This .pto I loaded into Hugin and chose one of the photos (preferably the one in the middle) for anchor. For exposure anchor, I chose the middle photo of the Calvin and Hobbes graffitto, as that was the one I was most interested in.
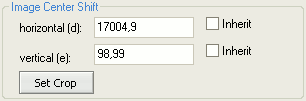 After that, the fun part began. PanoTools can't move pictures in the way of assigning an X and Y offset to each of them. Instead, each picture can have an individual "center shift" in the "Camera and Lens" tab. I made shameless use of that by simply unchecking the "inherit" box for the d and e parameters.
Now, when optimizing, Hugin didn't allow me to exclude my anchor from having it's lensshift optimized because it groups these settings by lens number, so I had to assign a unique lens to my anchor by selecting it and then clicking the "New Lens" button. After that, I could move to the next tab.
Everything Is Under Control
Autopano-SIFT generated control points for putting two adjacent images together, and it did a really nice job there. But! Optimizing with only these control points gives Panorama Tools no hint whatsoever about which parts of the images should be on the same height, or to say it more technically: PTOptimizer has too many degrees of freedom yet. With over fifty pictures to put together, small errors will accumulate and you won't end up with a straight picture of your wall, but with a pretty snaky stitch...
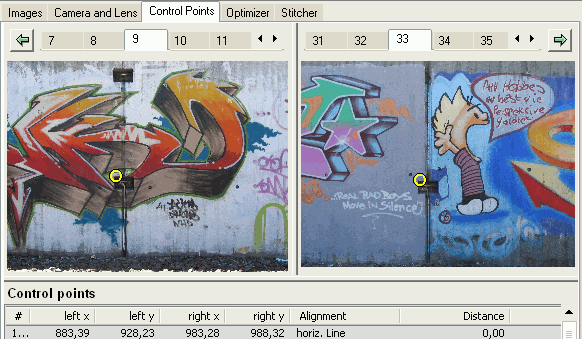
That's why I had to give PTOptimizer a pretty good idea of what a "straight" picture is. For this, it's useful if your scenery contains a horizon, or at least objects that appear throughout the scenery and that are always at the same height. In my case, the wall consists of several concrete segments having a visible gap in between. Somewhere along these gaps, there are cavities made for the grounding wires which appear to be at the same height every time.
So I identified all the photos having these gaps approximately at their center and created control points of type "horizontal line" between all of them, that way hinting PTOptimizer that all the cavities mentioned above should be on the same height. That is, if my images with the gap at their center were 2, 9, 13 and 20, I would make control points for these image pairs: 2-9, 2-13, 2-20, 9-13, 9-20 and 13-20.
In addition, each gap image received a control point pair of type "vertical line" along the gap, just to be sure. I don't know if that was really necessary, but it won't hurt to give PTOptimizer that extra bit of information.
Make It Better
Now that I was all set, I could start running the optimizer. To make sure that I get my "horizon" straight, I used the following order of optimizations:
| Lens shift only |  x shift and y shift (parameters d and e) only, the first lens checked, the second lens not checked x shift and y shift (parameters d and e) only, the first lens checked, the second lens not checked |
| Anchor rotation | Only roll (parameter r) for the anchor image
Make sure you have a precise control point pair of type "vertical line" in the anchor to make sure this works out correctly. |
| The Rest, leaving y shift untouched | x shift (for finetuning), roll (rotation) and fov (zoom) (parameters d, r and v); again, second lens not checked, as well as your anchor image in the "roll" list |
Update! José M. López-Cepero writes: “I have been puzzled for a while because Hugin did not seem to work right - even slight values for the central offset of the images would yield heavily distorted panoramas. The solution is to make sure that the barrel distortion ('b' parameter) is set to zero - once I realized that, everything was smooth sailing.” Thanks, José, for that valuable bit of information!
Before I started the first preview, I changed the "Projection" type in the "Stitcher" tab to "Rectilinear", which is the correct choice for this type of stitch. The standard "Equirectangular" or "Cylindrical" type of stitch is used for the usual 360� panoramas. Then, after pressing the "preview" button, I didn't see anything! No, wait, there's my panorama, right in the middle... the tiny line of pixels. Apparently, Hugin got confused by the mass of images and got my FOV settings wrong. Adjusting the bottom slider towards the left and the right slider towards the top until I had only small black boders left helped.
As always, your mileage may vary from here, and it might be that another order of optimizations works better for you. If you don't like the result, you might need to fiddle a little. A nice trick if you need or want to start from scratch without reloading your original file (which takes forever and resets all settings) is to mark all images in the "Images" tab and press the "Reset" button to reset all image orientation parameters, then to go to the "Camera and Lens" tab and, for one image using lens 0, to check the "inherit" boxes for both lens shift parameters, enter zero in both edit fields and then uncheck the check boxes again.
Coffee Break
When the preview looked alrightish to me, I went over to the "Stitcher" tab and produced a small, quick and dirty stitch first. I didn't need any fancy stuff, just wanted to check whether the stitch would become sufficiently straight, so I chose to use the nona engine, which is lightning fast compared to PTStitcher, and made it create a 6000 pixel wide JPG. This I loaded into the GIMP and made a horizontal guideline at the height of the central wall cavity (you know, the ones I used to place my control points on). When I had decided that the other cavities didn't deviate from the guide too much, it was time for the final stitch.
I cranked the image width up to 40000 pixels, resulting in a calculated height of 2180 pixels. Remember that a lot of that is black border, so it's a good idea to err on the safe side. "Calculate Optimal Size" doesn't work for such large stitches, as it will limit your image to about 10k width, resulting in a height of measly 550 pixels.
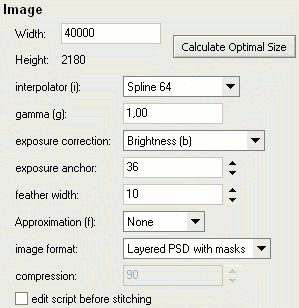 For stitcher engine, I chose PTStitcher, as nona can't perform exposure correction and doesn't write multi-layer PSD with layer masks either. I selected Spline64 filtering, exposure correction only for brightness (b) and output file format to "Layered PSD with masks". You might want to choose other settings, but Layered PSD with masks is great for tuning the result afterwards, so I highly recommend that. Then it was time to hit the "Stitch now!" button and leave the PC alone for a while.
Beware: PTStitcher generates a frickin' lot of temporary data during the stitch. You're well advised to free up at least two, or better three gigabytes of space to make sure PTStitcher doesn't run out of space after a while. During my final stitch, I had to frantically move some videos out of the way while putting PTStitcher's task priority to lowest to prevent serious trouble.
Manual Labor
When the final stitch was finished and proudly lay on my harddisk in a 600MB PSD, the actual fun began. And by fun, I mean four hours of mind-boggling, eye-straining precision mouse wrangling1.
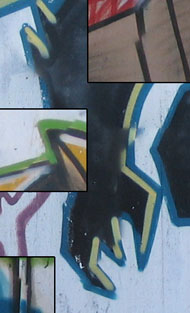
I opened the file in the GIMP and, one by one, started optimizing the layer masks so that the transitions lay inside single-colored areas most of the time, which meant following the shapes of the graffiti, sometimes over pretty long distances. At this point, having more than 50% of overlap saved my life several times.
Note: You might be tempted to use Photoshop for editing the final stitch, but due to a bug in PTStitcher, some of the larger PSDs it produces cannot be opened by Photoshop. The GIMP, fortunately, opens those files without complaining. You need version 2.2 or newer of the GIMP; older versions don't support layer masks.
Update: Erik Krause kindly informed me that there's a way of getting such big stitches into Photoshop. You can select "Multiple TIFF with masks" as output format and use a set of Photoshop Actions Erik created to quickly combine these TIFFs into a multilayered image. You can get the actions from Erik's Tips, Tools and Techniques page. Thanks, Erik!
Concerns
Several people have approached me, asking why I tweaked the transitions by hand instead of using enblend. The answer is twofold: Firstly, enblend messes up the transition lines, and secondly, I'm crazy enough to invest four hours to hand-tune the transitions instead of living with endblend's results =)
Let me elaborate on the "enblend messes up the transition lines" part: What enblend does is generate a transition line that's farthest from the borders of the overlapping section. Thus, that line is not dependent on actual image content, but rather on the geometry of the remapped source images. Actual image content is only considered during the actual blending, where enblend basically adjusts the transition line's feather width based on image content. If you want more detailed information on the way enblend works, read the "How Enblend Works" article on the enblend home page.
 In most cases, like nature photography, or when the mapped images fit together really nicely, enblend's way of creating a transition line is perfectly sufficient, since it fulfills the primary need of having the largest possible reserve of image data to its left and right, so wide transitions become possible. In my case, however, it was much more important that the transition line itself is based on the image content, because my images didn't align well in a lot of places. Thus, enblend produced bad transition lines that couldn't be fixed by adapting the feather width, resulting in torn graffitti lines.
In the same line, people asked whether it was really necessary to perform exposure correction, which required the much slower PTStitcher. The answer to this is a clear yes! Firstly, the lighting during the shooting wasn't as stable as I would have liked, and secondly, I did not do what I told you at the beginning of this tutorial - lock the exposure settings on my camera... *blush*
Also, my final image shows a slight exposure gradient from left to right - I could have corrected that by overlaying the final result with a gradient-filled layer using "Soft Light" combination mode, but, frankly, I didn't notice the gradient until people told me, and I don't really care about it.
Instant Reward
After having aged my eyes by at least half a year in a span of four hours, I flattened the image, cropped most of the remaining black borders, filled the rest using the clone brush and done I was. Phew.
